程序设计
6940并没有在射球上采取某些标新立异的算法(实际上射球部分的总代码量不超过150行),但其最终效果依然能达到相对稳定。
主程序设计
shooter部分的程序采用了类似状态机的设计逻辑。将完整的射球部分拆分为3个状态:
- limelight 辅助瞄准,左右调整shooter方向,并测算机器到 hub 的距离。
- 根据测算的距离,飞轮开始加速,hood旋转到目标角度。
- blocker转动,带动球向上移动。
具体的转换逻辑如下:
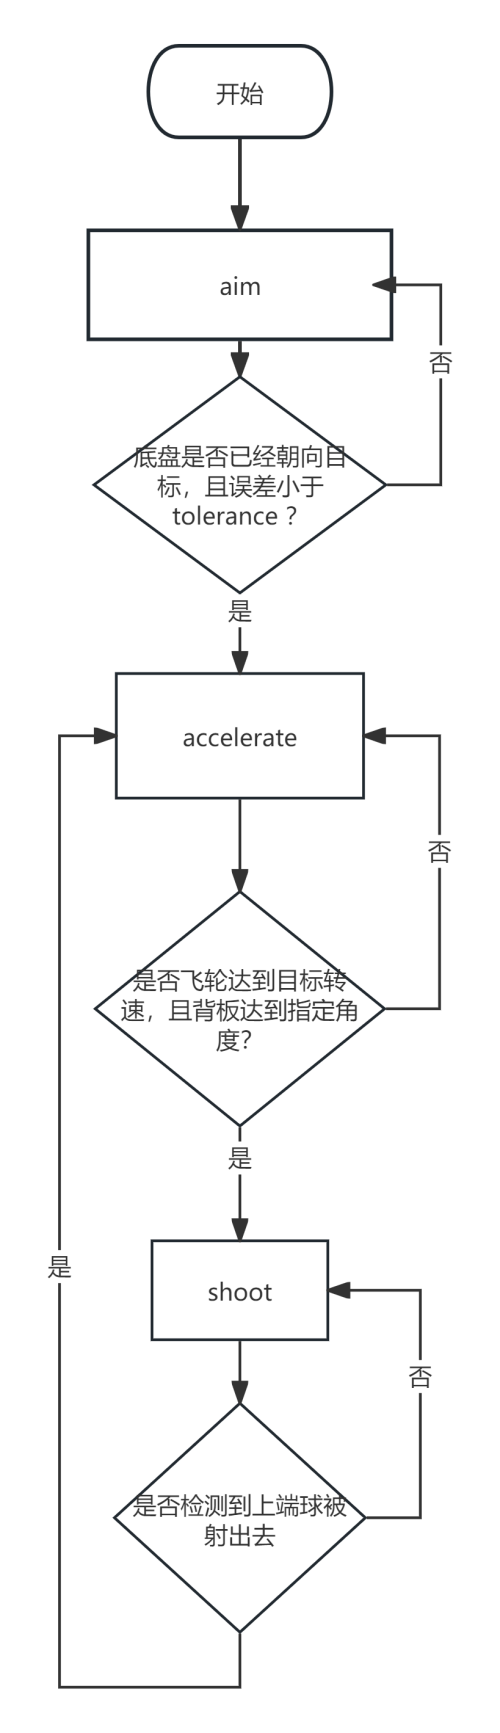
一个完整的射球 cycle 可以概括如下:
- 进入 aim 状态 limelight 辅助瞄准,底盘转动,左右调整 shooter 方向。
- 当机器对准 hub 时,进入加速阶段,飞轮开始旋转, hood 调整到目标角度。
- 当飞轮转速到达目标值,hood移动到目标角度时。blocker转动,直到上球路传感器显示没有球,说明 shooter 射出去一个球。
- 在 shooter 回到加速状态,继续加速,直到第二次达到目标转速,与此同时,在自动供球系统的操作下,第二个球被供到blocker下方。
- shooter 达到目标速度,再次进入 shoot 状态,第二个球射出。
控制代码节选:
public class ShootBall extends CommandBase {

  public enum ShooterState {
    Aiming,Accelerating,Shooting
  }
  ShooterState m_State;
  double m_TargetDistance;
  double m_ShootRPM;
  double m_ShootHood;
  boolean m_IsAuto;
  public ShootBall(boolean _IsAuto) {
    addRequirements(RobotContainer.m_swerve);
    addRequirements(RobotContainer.m_Hood);

  addRequirements(RobotContainer.m_Shooter);
    m_IsAuto=_IsAuto;
  }


  // Called when the command is initially scheduled.
  @Override
  public void initialize() {

    m_State=ShooterState.Aiming;
  }

  // Called every time the scheduler runs while the command is scheduled.
  @Override
  public void execute()
  {
      if(m_State==ShooterState.Aiming)
      Aim();
      if(m_State==ShooterState.Accelerating)
      Accelerate();
      if(m_State==ShooterState.Shooting)
      Shoot();


    SmartDashboard.putString("shooterState", m_State.toString());
  }

  void Aim()
  {
    RobotContainer.m_Limelight.setLightMode(3);
    double _tv=RobotContainer.m_Limelight.Get_tv();
    RobotContainer.m_Shooter.SetBlockerOutPut(0.);
    // SmartDashboard.putNumber("Distance" ,);
    //这部分直接使用条件判断而不是pid旋转来调整机器的方向,避免了PID可能导致的自激振荡问题。
    if(_tv==1.)
      {
        double _tx=RobotContainer.m_Limelight.Get_tx();
        if(_tx<-ShooterConstants.ShootingDegreeTolerance)
          RobotContainer.m_swerve.Drive(new Translation2d(), ShooterConstants.ShootingFixSpeed, false, false);
        else if(_tx>ShooterConstants.ShootingDegreeTolerance)
          RobotContainer.m_swerve.Drive(new Translation2d(), -ShooterConstants.ShootingFixSpeed, false, false);
        else
        {

        RobotContainer.m_swerve.Drive(new Translation2d(), 0, false, false);
          m_TargetDistance=RobotContainer.m_Limelight.getRobotToTargetDistance();
          m_ShootRPM=ShooterConstants.kRPMTable.getOutput(m_TargetDistance);
          m_ShootHood=ShooterConstants.kHoodTable.getOutput(m_TargetDistance);
          RobotContainer.m_Limelight.setLightMode(1);
          m_State=ShooterState.Accelerating;

        }
      }
      else{
        RobotContainer.m_swerve.Drive(new Translation2d(), 0, false, false);

      }
  }
  //值得一提的是,一旦aim的状态结束,所算得的distance就固定下来,哪怕接下来limelight什么都扫不到也不会干扰shooter出球,这有效避免了limelight突然抽风导致射球终止的问题
  void Accelerate()
  {
    RobotContainer.m_Shooter.SetSpeed(m_ShootRPM);
    RobotContainer.m_Hood.SetHoodAngle(m_ShootHood);
    if(RobotContainer.m_Shooter.IsSpeedReached()&&RobotContainer.m_Hood.IsHoodAtAngle())
    {
      m_State=ShooterState.Shooting;
    }

  }
  void Shoot()
  {
    if(!RobotContainer.m_Hopper.NoBallOnTop())
      RobotContainer.m_Shooter.SetBlockerOutPut(1.0);
    else
    {
      RobotContainer.m_Shooter.SetBlockerOutPut(0.);
      m_State=ShooterState.Accelerating;
    }
  }

  // Called once the command ends or is interrupted.
  @Override
  public void end(boolean interrupted)
  {
    RobotContainer.m_Shooter.SetBlockerOutPut(0.);
    RobotContainer.m_Shooter.SetSpeed(1200);
    RobotContainer.m_Limelight.setLightMode(1);
  }

  // Returns true when the command should end.
  @Override
  public boolean isFinished() {
    return !RobotContainer.m_driverController.getRightBumper()&&!m_IsAuto;
  }
}
参数调整
shooter 的参数调试格外复杂,在此列举一些6940的调试小贴士:
- 不要过分纠结 shooter 的 PID 参数,因为 shooter 并不是一个均匀的系统,所以哪怕考虑前馈也不太可能调出一组对于任意给定转速都能精准达到目标转速的 PID 参数,只要尽可能消除飞轮转速的抖动即可。因为 PID 的本质是建立一个目标转速和电机转速的映射,只要保证对于任意给定的目标转速,shooter 都能到达一个恒定的转速就可以了。
- 在调插值表的时候,以 limelight 测算的距离为准,而不是以实际距离,因为实际读取插值表的时候是将 limelight 读到的距离投入插值表。